If you have ever used Google PageSpeed Insights, you might have seen a suggestion – “Eliminate Render Blocking Resources”. Their speed impact is massive and removing them can speed up your website by many seconds.
Now, you might be wondering, “What is this render-blocking resource?” and “How do I fix it?”. We’ll be going over all of this, and more, in this post on eliminating render-blocking resources in WordPress.
Here’s a video that you can check out too:
If you did not like the video or want text instructions, read forward :
What are render blocking resources
Before we start fixing the issue, we must understand what render-blocking resources actually are.
Your themes and plugins all contribute to this issue. Your theme and plugins add their own CSS (Cascading Style Sheets) and JavaScript. Some of the CSS and JS added by plugins and themes are useless waste, and that’s what slows your website down.
When this CSS and JS block the rendering (loading) of your webpage, it is referred to as ‘Render Blocking CSS and JS’.
If you still didn’t get it, here’s a simpler explanation:
Imagine you are a browser bot. When a visitor lands on a website, you (the browser) have to read the code of the website before you can show it.
When you (the browser) encounter a JS or CSS file, it has to be downloaded and processed, and that takes time.
During that time, your website is still loading, and the visitor will leave if it takes too long.
Now, I hope that it is clear as to what is render-blocking CSS and JS.
Is it compulsory to get 100 in Page Speed Insights?
No, it is not compulsory to get a perfect score in Google PageSpeed Insights. If you are looking to achieve perfection in Google PageSpeed Insights, then you must stop thinking so. Speed is a big factor in SEO but speed is not everything.
Google just gives you suggestions, these are not school rules that you must follow. You must keep in mind that you must not ruin the user experience in your attempt to score 100 marks in Google’s tool.
Also, you must not fully sacrifice speed for the sake of the user experience. You must maintain a balance between the two. A good site has a robust user experience and good speed.
Having said so, let us now move forward. Today we shall be showing you three free options as to how you can eliminate render-blocking resources in your WordPress site.
As we all know that diagnosis comes before cure, so first let us explore how to know if your site really has a large amount of render-blocking resources or it’s just a small amount that can be overlooked.
Related: How to add a navigation menu in WordPress
How to find render blocking resources on your site
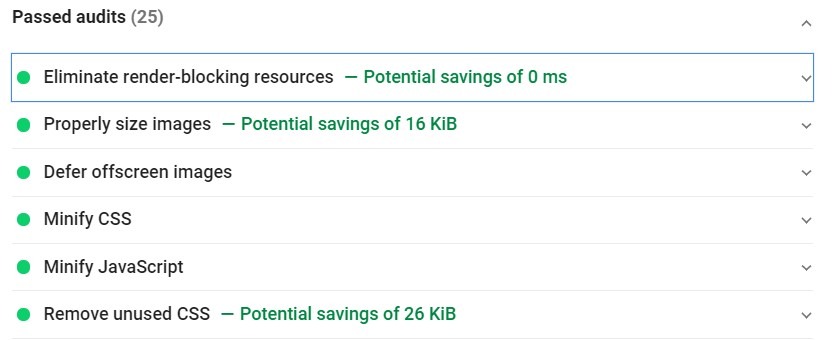
Head over to PageSpeed Insights and type in the URL of your site. Let the results load. After you see your score, scroll down a bit until you come to this section –
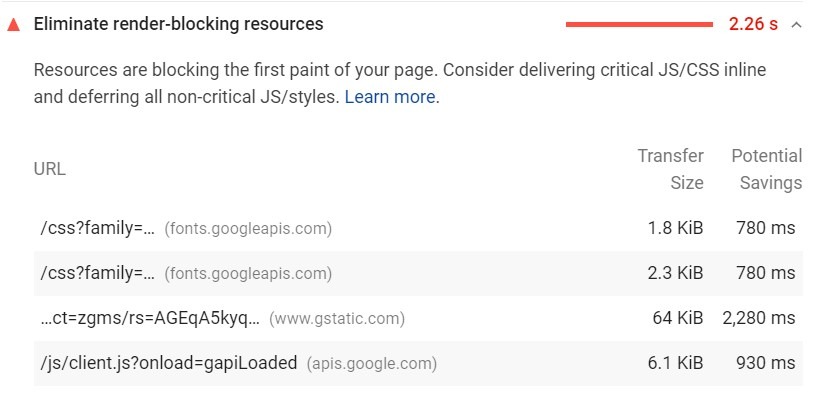
Now you shall get to know that you actually have to fix render-blocking resources on your site.
There are three free ways to fix this problem and I shall break them down to you one by one.
Autoptimize Plugin + Async JavaScript
This is a combination of two plugins from the same developer. Download and activate both the plugins, Autoptimize, and Async JavaScript.
We’ll set up Async first. For that go to Settings > Async JavaScript.

In the settings tab, hit the check on Enable Async JavaScript. Below that, choose ‘Apply Async’. If it does not work for you, then try the other options although it shall work for most people.
In the third setting, choose Async or Defer according to what you chose above. In the last setting, you must test which option works for you. If one doesn’t work then choose the other.
Once Async is done setting up, head over to Settings > Autoptimze.
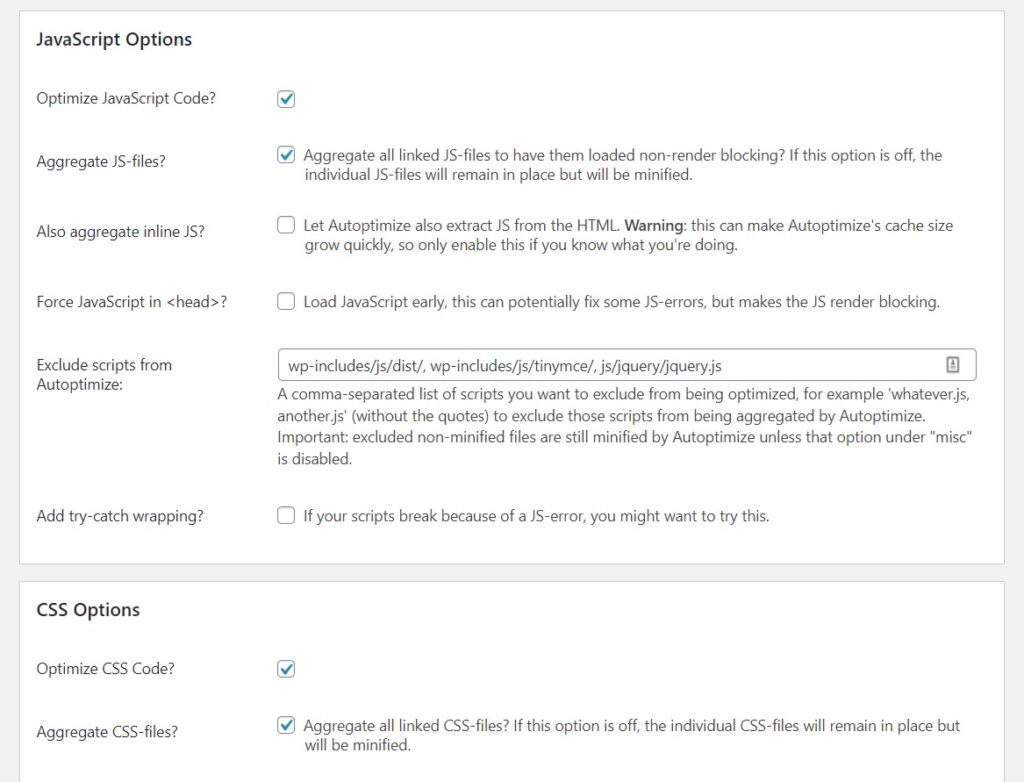
Checkbox Optimize JavaScript code and Aggregate JS Files. Also select, Optimize CSS Code and Aggregate CSS Files.
Below that select, Also Aggregate Inline CSS. Leave everything else unchecked as that could break your site down.
Now, scroll down to the Misc Options in Autoptimze.
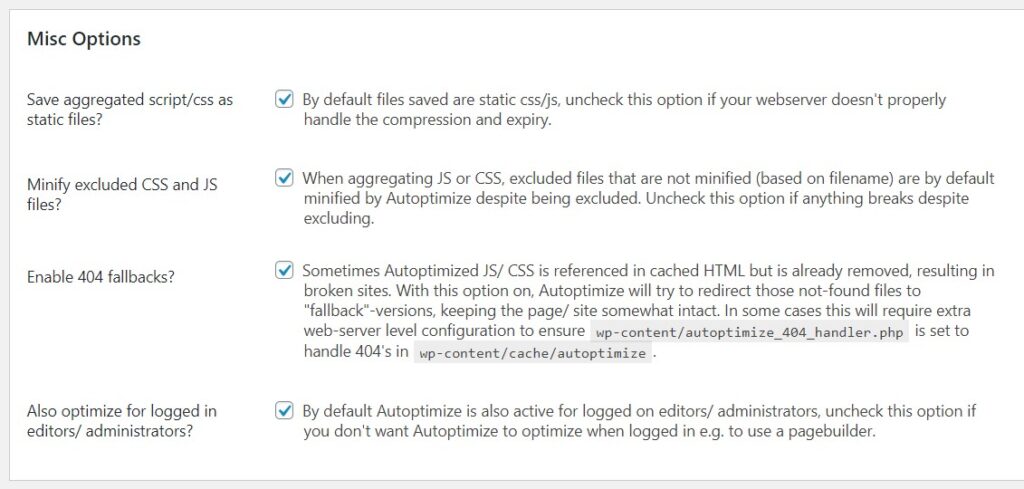
Check all the four options present here. This is it. Now most of the render-blocking CSS and JS would have been eliminated. Wait for five minutes.
If you test your site without waiting, then Google PageSpeed Insights shall show you your old cached score and you might end up deleting very useful plugins.
Now, run a speed test on your website and you shall see the results. We checked our site and see the results –
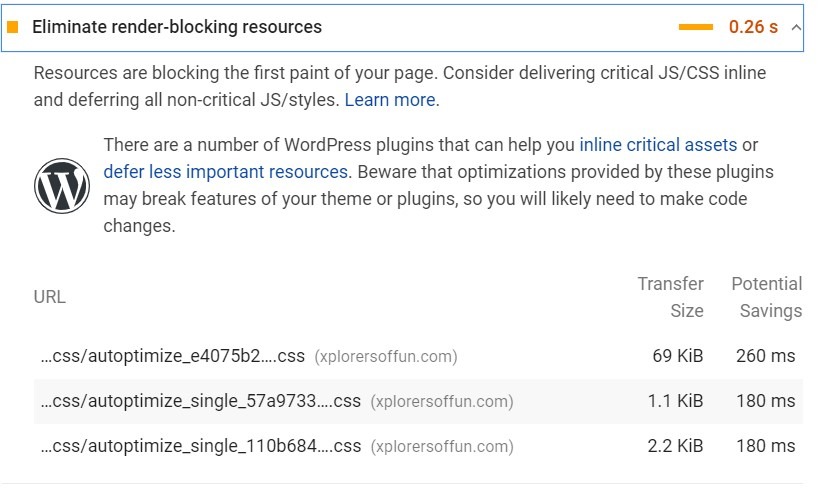
As you can see most of the render-blocking JavaScript and CSS were eliminated. The unused CCS was just the CSS left behind by Autoptimize.
That’s nothing to worry about. Now, your score might have gone up too. Let’s move on to the next method now.
Using W3 Total Cache
This is an all-in-one plugin for caching and minification. Below are the steps to set this up:
- Go to Performance > General Settings.
- Head over to the Minify heading on the settings page.
- Checkbox the Enable box in Minify Heading
- Select the minify mode to ‘manual’
- Last but not the least, Save all settings.
Now, go back to PageSpeed Insights and take note of all the render-blocking scripts. Either write them down on paper or copy-paste them in a notepad.
Now, head over to Performance > Minify in the W3 Total Cache settings…..
In the operations in areas section, choose non-blocking defer before </head>
Moving on, in the next section (JS File Management), Choose your active theme and click on add script. Next, copy/paste all those JS scripts over here which you found in Google Pagespeed Insights…..
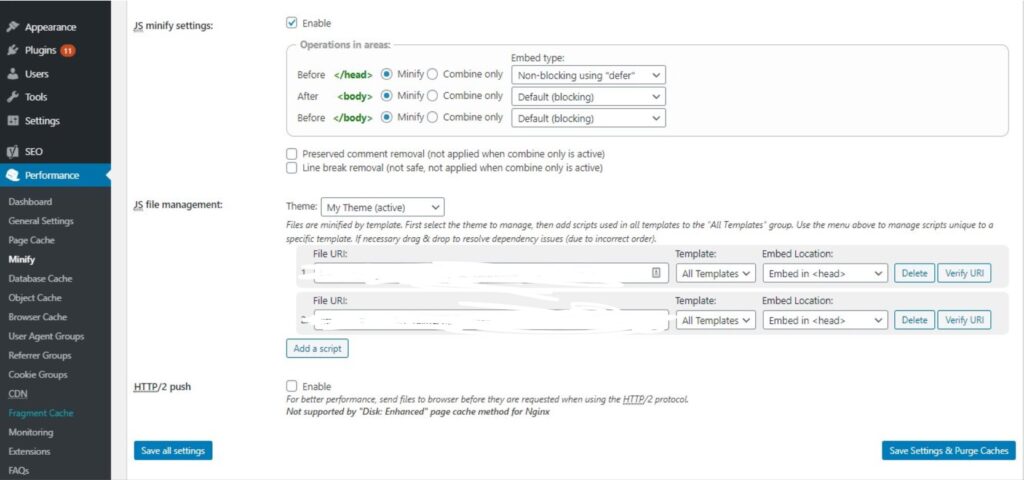
Now, scroll down to the CSS section. Choose your theme and click on add a style sheet. Then enter all render-blocking CSS from page speed insights and then paste it there. Lastly, Save your settings.
Using Speed Booster Pack
Speed Booster Pack is another amazing plugin to eliminate render-blocking resources in WordPress. With the help of this plugin, we completely removed render-blocking CSS and JS which was not possible in Autoptimize as it added its own CSS. So let us now set up this plugin:
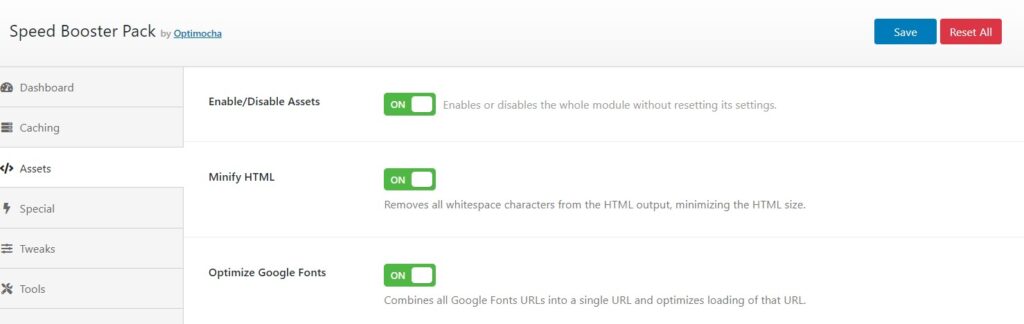
Install and activate this plugin. Find its settings in your wp-admin sidebar. Then, go to Speed Booster >> Assets. You shall be greeted with a page like this –
Note- This plugin keeps on changing its interface and settings, but we shall try our best to keep on updating this post with the newest screenshots and fixes
Now its time to start the fix-
First of all, enable assets and minify HTML. Also, checkbox Optimize Google Fonts. Next, scroll down a bit and you shall come to this section –
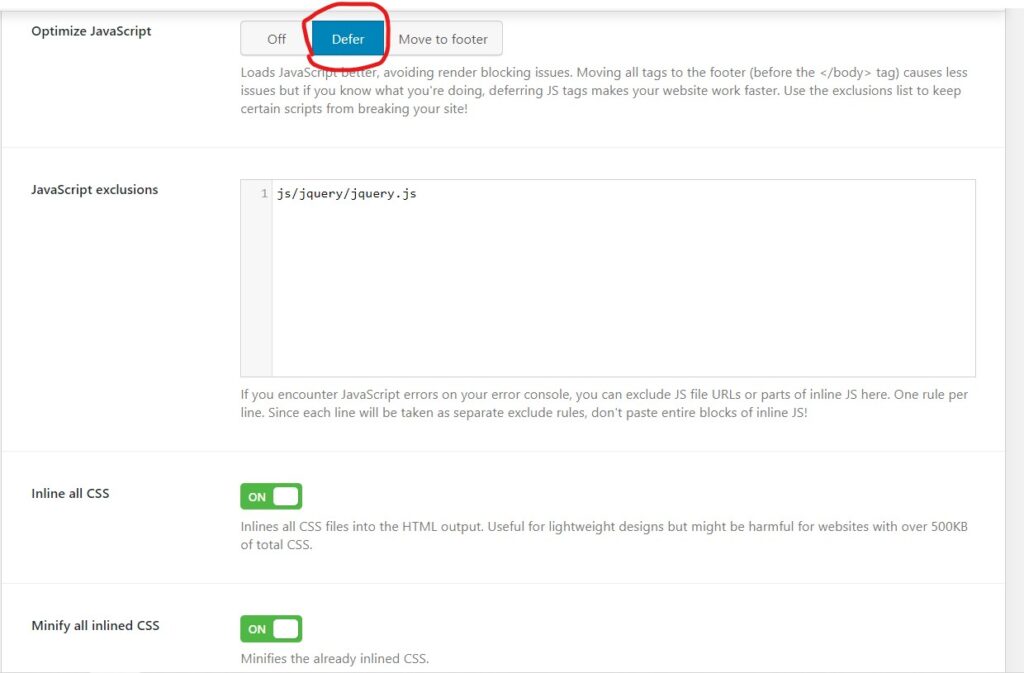
Here select the following settings –
- Defer JavaScript
- Inline all CSS
- Minify all in-lined CSS
Now, save these settings. First, visit your site and check if it’s completely fine and not broken. Then, go to PageSpeed Insights and test your site.
We tested our site and the render-blocking resources were fully eliminated.
Using WP-Optimize Plugin
WP-Optimize is one of the best free caching and database cleanup plugins available on the market these days! It has everything you would want from a performance plugin while being free!
This plugin can help you eliminate render-blocking resources on your site, enable caching, clean your database, and minify JS and CSS. So, the steps are as follows:
Step 1. Once you have the plugin downloaded from the WordPress repository, in your WordPress sidebar, go to ‘WP-Optimize > Minify’
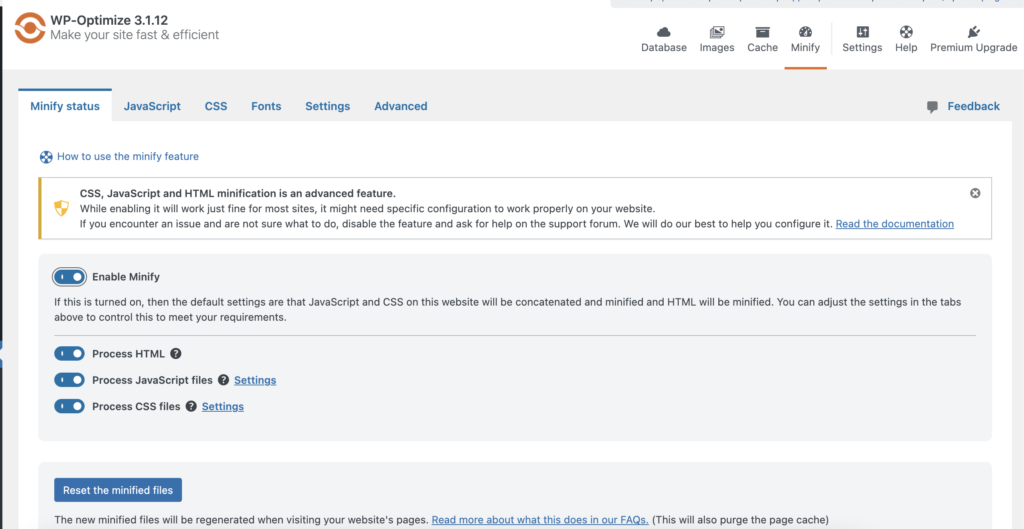
Step 2. In the minification settings, click on ‘Enable Minify’. Now enable minification for JS, CSS, and HTML. And then click on ‘Reset MInified Files’ once.
And that’s it! It would have now removed render-blocking resources from your WordPress site.
Conclusion
Our list of 4 free plugins to fix this issue comes to an end. There is also a paid plugin – WP Rocket which is an all-in-one optimization plugin.
If you are looking to invest money in your blog, then you can choose to buy it as it can give you a heavy boost. That is why it is the #1 caching plugin for WordPress.
Lastly, I have two questions for you –
- Which plugin will you try first, Autoptimize, W3 Total Cache, WP-Optimize or Speed Booster Pack?
- Did you eliminate render blocking resources on your site after using any of the above methods?
If you liked this tutorial, subscribe to our YouTube channel and like our Facebook Page. Also, don’t forget to share this post, because – “Sharing is Caring”.


Sir, how to async js in wp rocket plugin?
Hi,
You can do so by going into file optimization in WP Rocket and selecting ‘Load JS Deferred’
Please help I am facing Eliminate render-blocking CS and JS issues. Unable to define which plugin should I use. WP-rocket is also causing high CPU usage and resources.
Hi Syed,
I would recommend using WP-Optimize as it’s free and also is very easy to use